前回の記事では,Kohana を設置し,welcome ページが出るところまで試した。今回はテンプレートエンジンとして Smarty を導入してみる。
準備
Kohana の設置は前回どおり。Smarty のプラグインは親切な人が既に用意してくれているので,以下のページからダウンロードしてくる (kohana-module-smarty-3-2-3.zip)。
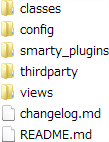
解凍すると,下図のようなファイル構成になっている。
このうち,classes, config, smarty_plugins, view を Kohana の application フォルダに移動する。また,thirdparty の中の smarty を Kohana の modules フォルダに移動する。このとき,Windows の場合は単純に移動すれば良いが,Mac だと同名のフォルダがある場合に移動先の中身が消えてしまうので,中身をひとつずつ移動しなければならない。最終的に次のような構成になるはずだ。
kohana/
 ├ application/
 │ ├ classes/
 │ ├ config/
 │ ├ smarty_plugins/
 │ ├ view/
 │ :
 ├ modules/
 │ ├ smarty/
 : :
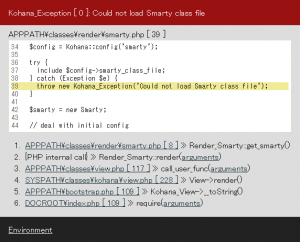
準備ができたので,試しに http://<設置した URL>/index.php/smarty にアクセスしてみる。すると次のようなエラーが表示される。
Smarty のプラグインのパスが間違っているようだ。application/classes/render/smarty.php で Kohana::config('smarty') の内容を表示させてみると,次のようになっていた。
Kohana_Config_File Object
(
    [_configuration_group:protected] => smarty
    [_configuration_modified:protected] =>
    [_directory] => config
    [storage:ArrayObject:private] => Array
        (
            [smarty_class_file] => C:\xampp\htdocs\kohana\modules\smarty/thirdparty/smarty/Smarty.class.php
            [php_handling] => SMARTY_PHP_QUOTE
            [smarty_config] => Array
                (
                    [compile_dir] => C:\xampp\htdocs\kohana\application\cache/smarty_compiled
                    [cache_dir] => C:\xampp\htdocs\kohana\application\cache/smarty_compiled
                    [template_dir] => Array
                        (
                            [0] => C:\xampp\htdocs\kohana\application\views
                            [1] => C:\xampp\htdocs\kohana\modules\smarty/views
                        )

                    [plugins_dir] => Array
                        (
                            [0] => C:\xampp\htdocs\kohana\application\smarty_plugins
                            [1] => C:\xampp\htdocs\kohana\modules\smarty/smarty_plugins
                            [2] => plugins
                        )

                    [config_dir] => C:\xampp\htdocs\kohana\application\smarty_config
                      :
smarty_class_file の位置が違っているようだ。これを修正するために,application/config/smarty.php を開き,次のように変更する。
//'smarty_class_file' => MODPATH.'smarty/thirdparty/smarty/Smarty.class.php',
'smarty_class_file' => MODPATH.smarty/Smarty.class.php',
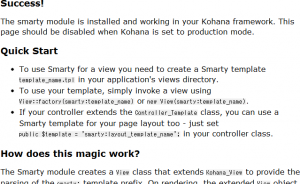
再度アクセスしてみると,次のようにデモページが表示された。
サンプルコード
以下に Smarty を使用するコントローラのサンプルコードを載せておく。
<?php defined('SYSPATH') OR die('No direct access allowed.');

class Controller_Test extends Controller {

	public function action_index() {
		// ビューインスタンスの生成
		$view = View::factory('smarty:<拡張子を除いたビューファイル名>');

		// 出力変数のセット
		$view->set('key', 'てすと');

		// 表示
		$this->request->response = $view->render();
	}

}
これで無事 Smarty を使用できそうだ。
参考ページ
- How to Create and Use Views – Unofficial Kohana 3.0 Wiki


コメント